


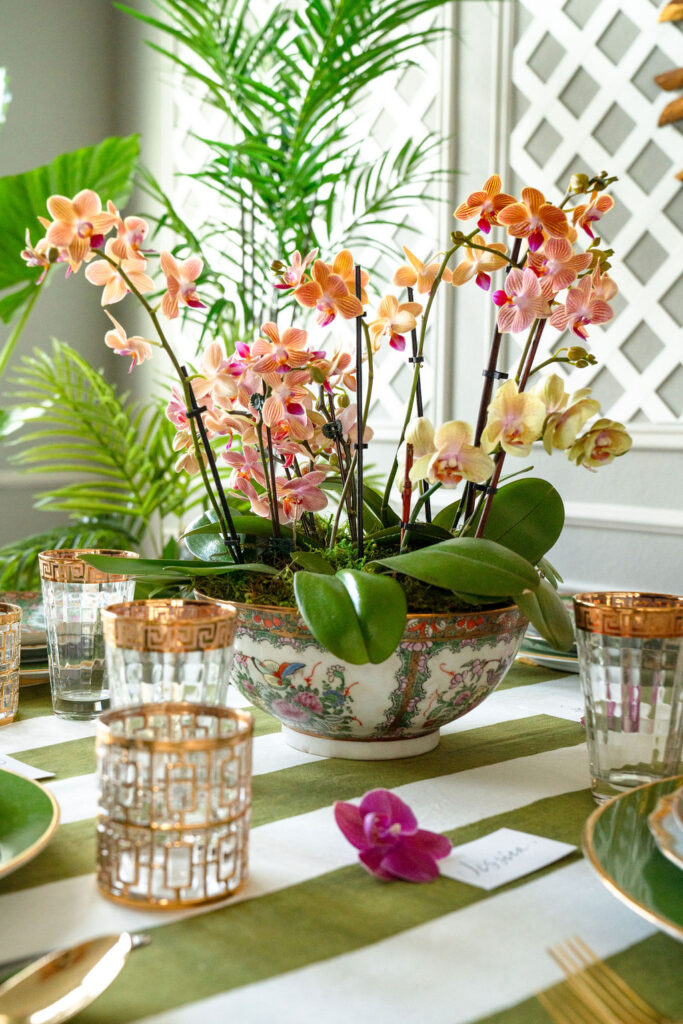
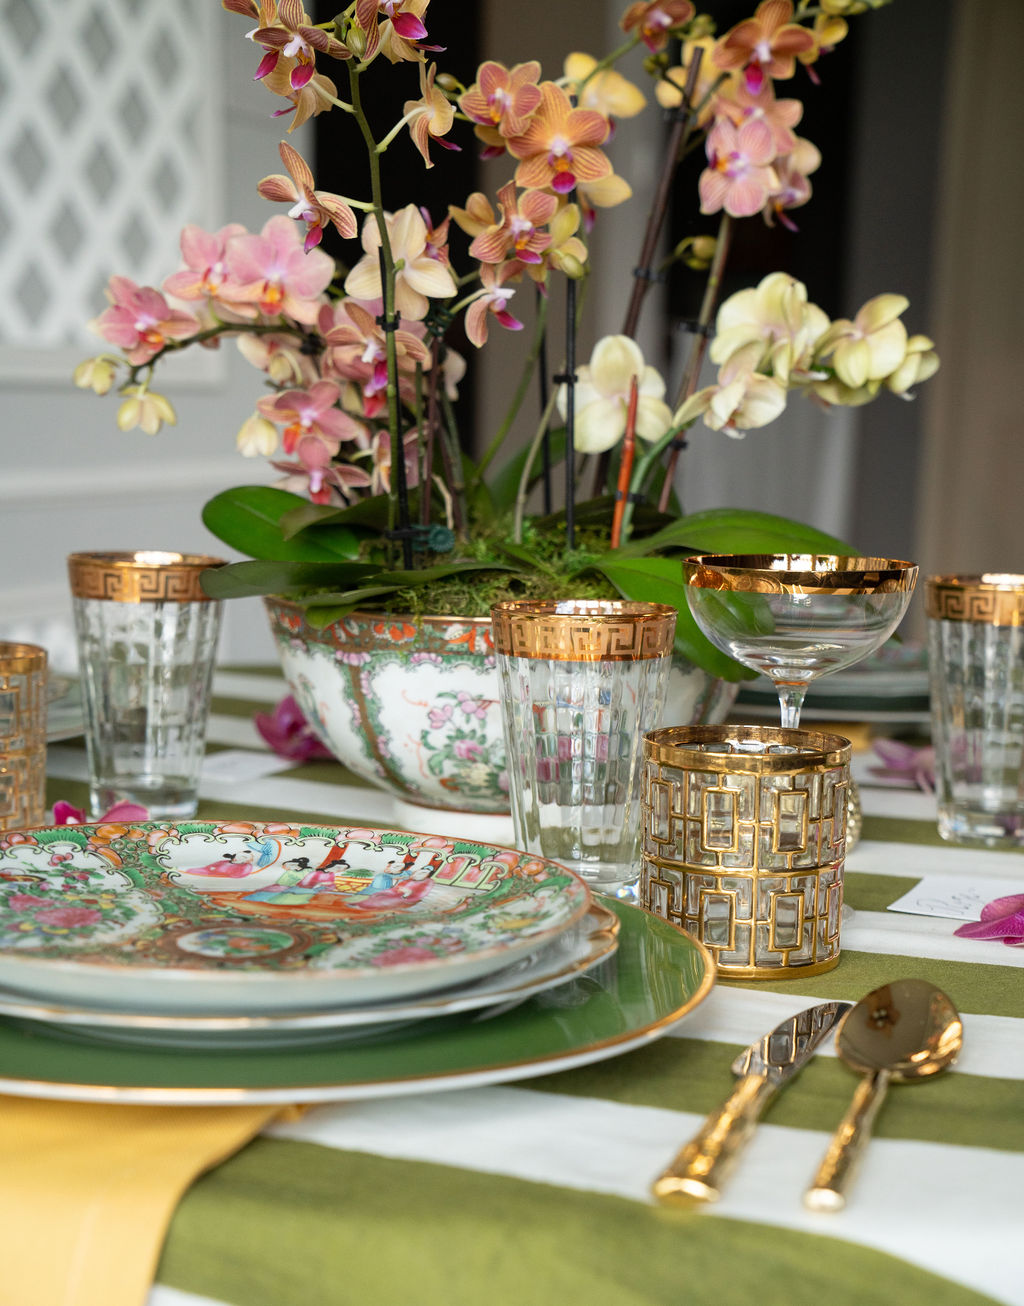
Looking to elevate the charm of your table with an elegant centerpiece that’s easy to make and long-lasting? We’ll walk you through the steps to craft a beautiful orchid centerpiece that will beautify your space for days to come. Whether you’re hosting a special dinner or simply want to add a touch of sophistication to your home, this DIY project is perfect for you. We made this arrangement to beautify our elegant green and white chinoiserie dinner tablescape, take a look at how it looked on the table here.

How to Create an Elegant Orchid Centerpiece
Materials You’ll Need:

– 5 mini orchid plants (consider adding more for a fuller arrangement)
– Thick garden plastic bag or sturdy plastic
– Bowl or low vessel
– Bag of moss
– Floral foam for faux flowers
– Water picks
-floral scissors
Step-by-Step Instructions for Creating an Elegant Orchid Centerpiece
1. Prepare the Base: Begin by cutting the plastic to fit the interior of your chosen bowl. This protective layer will shield your vase from water damage. Lay it carefully inside the bowl.


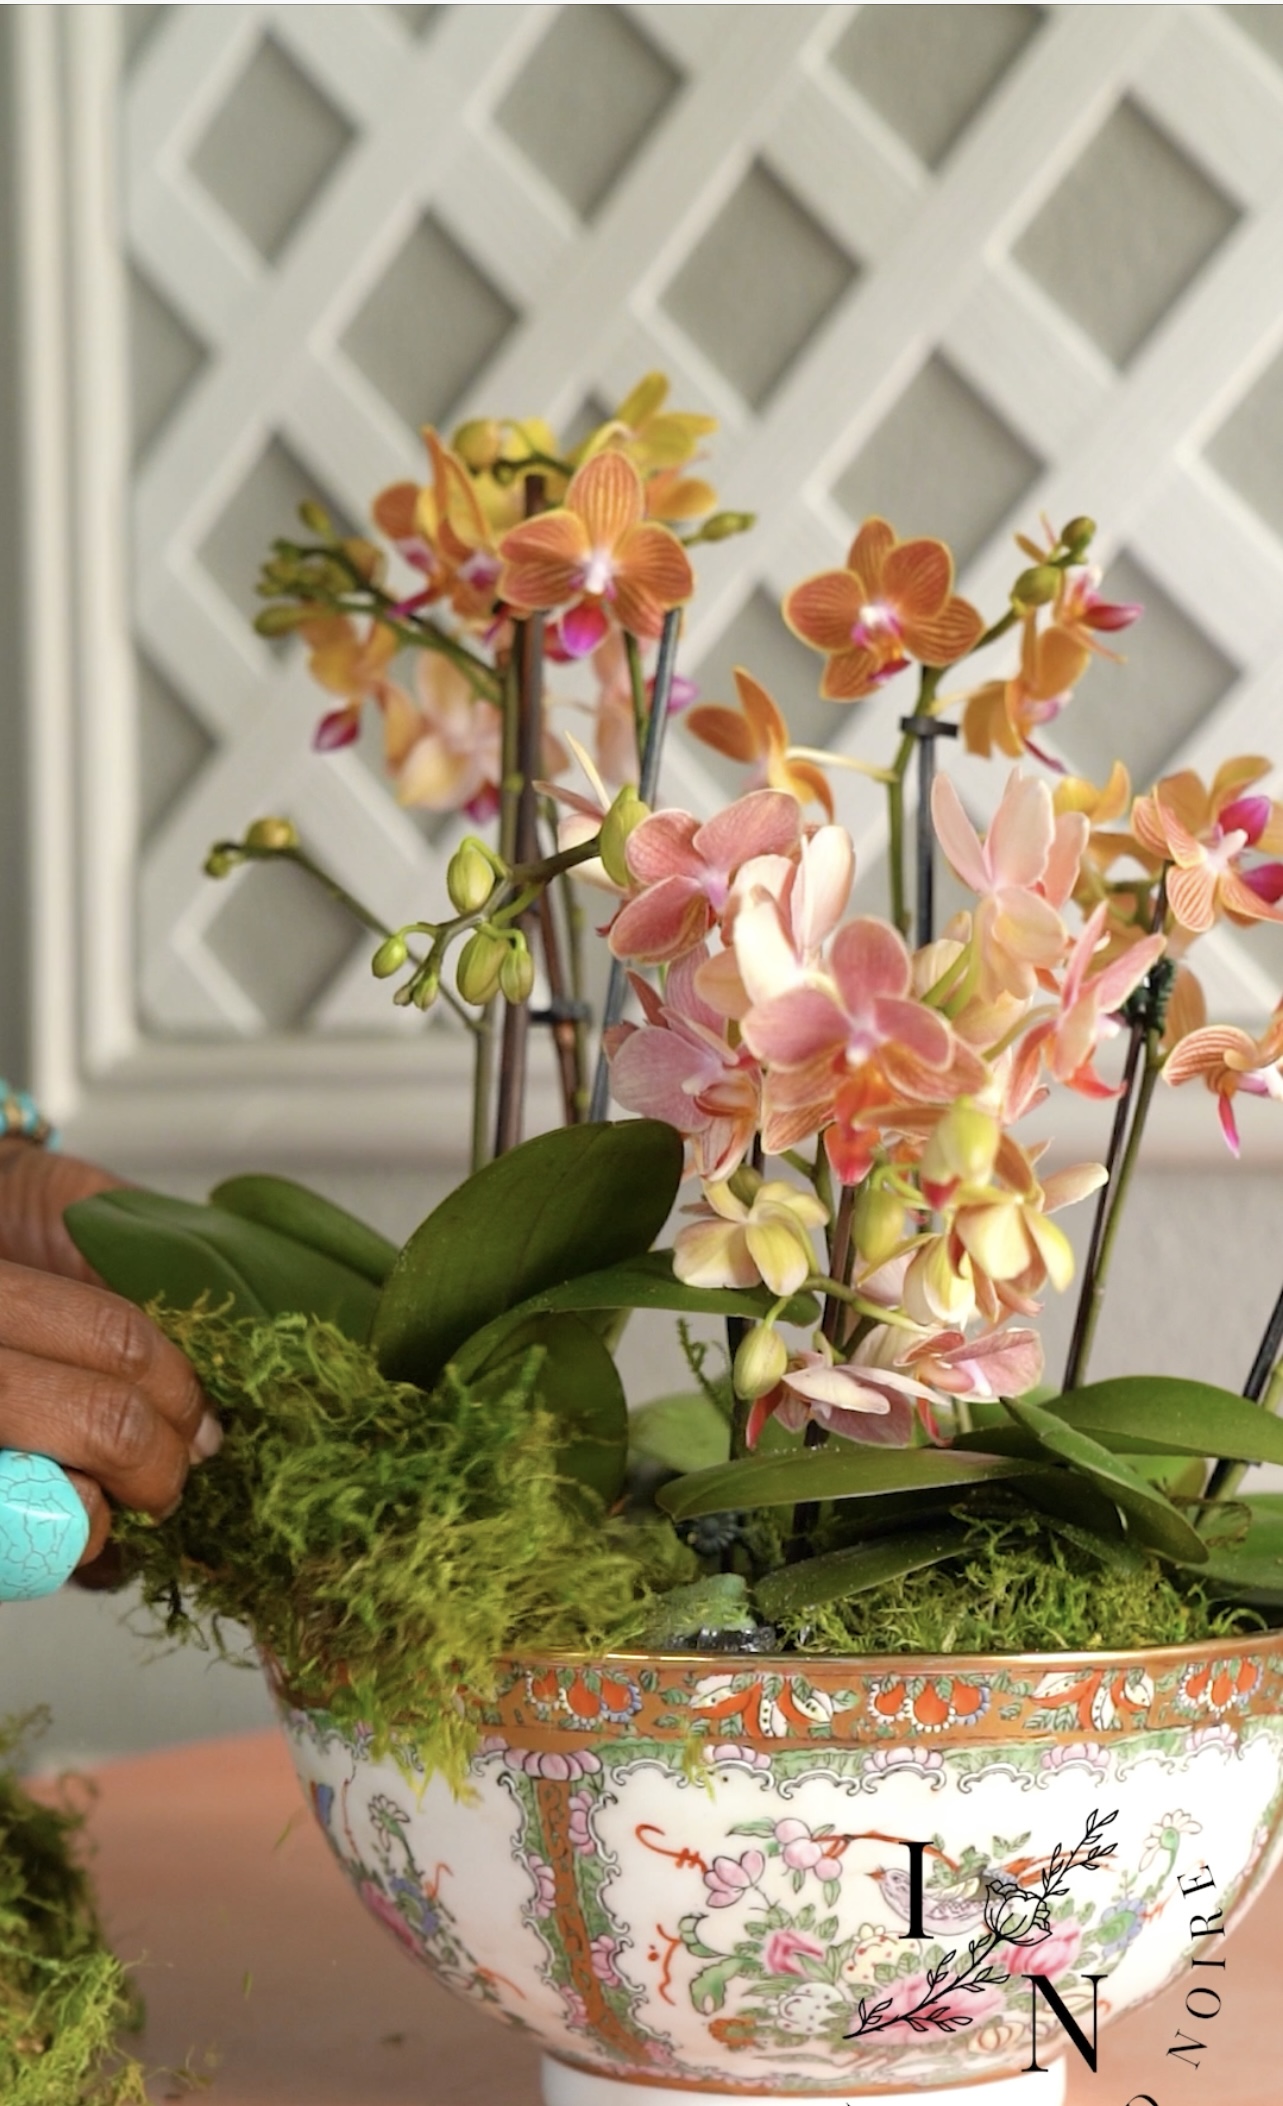
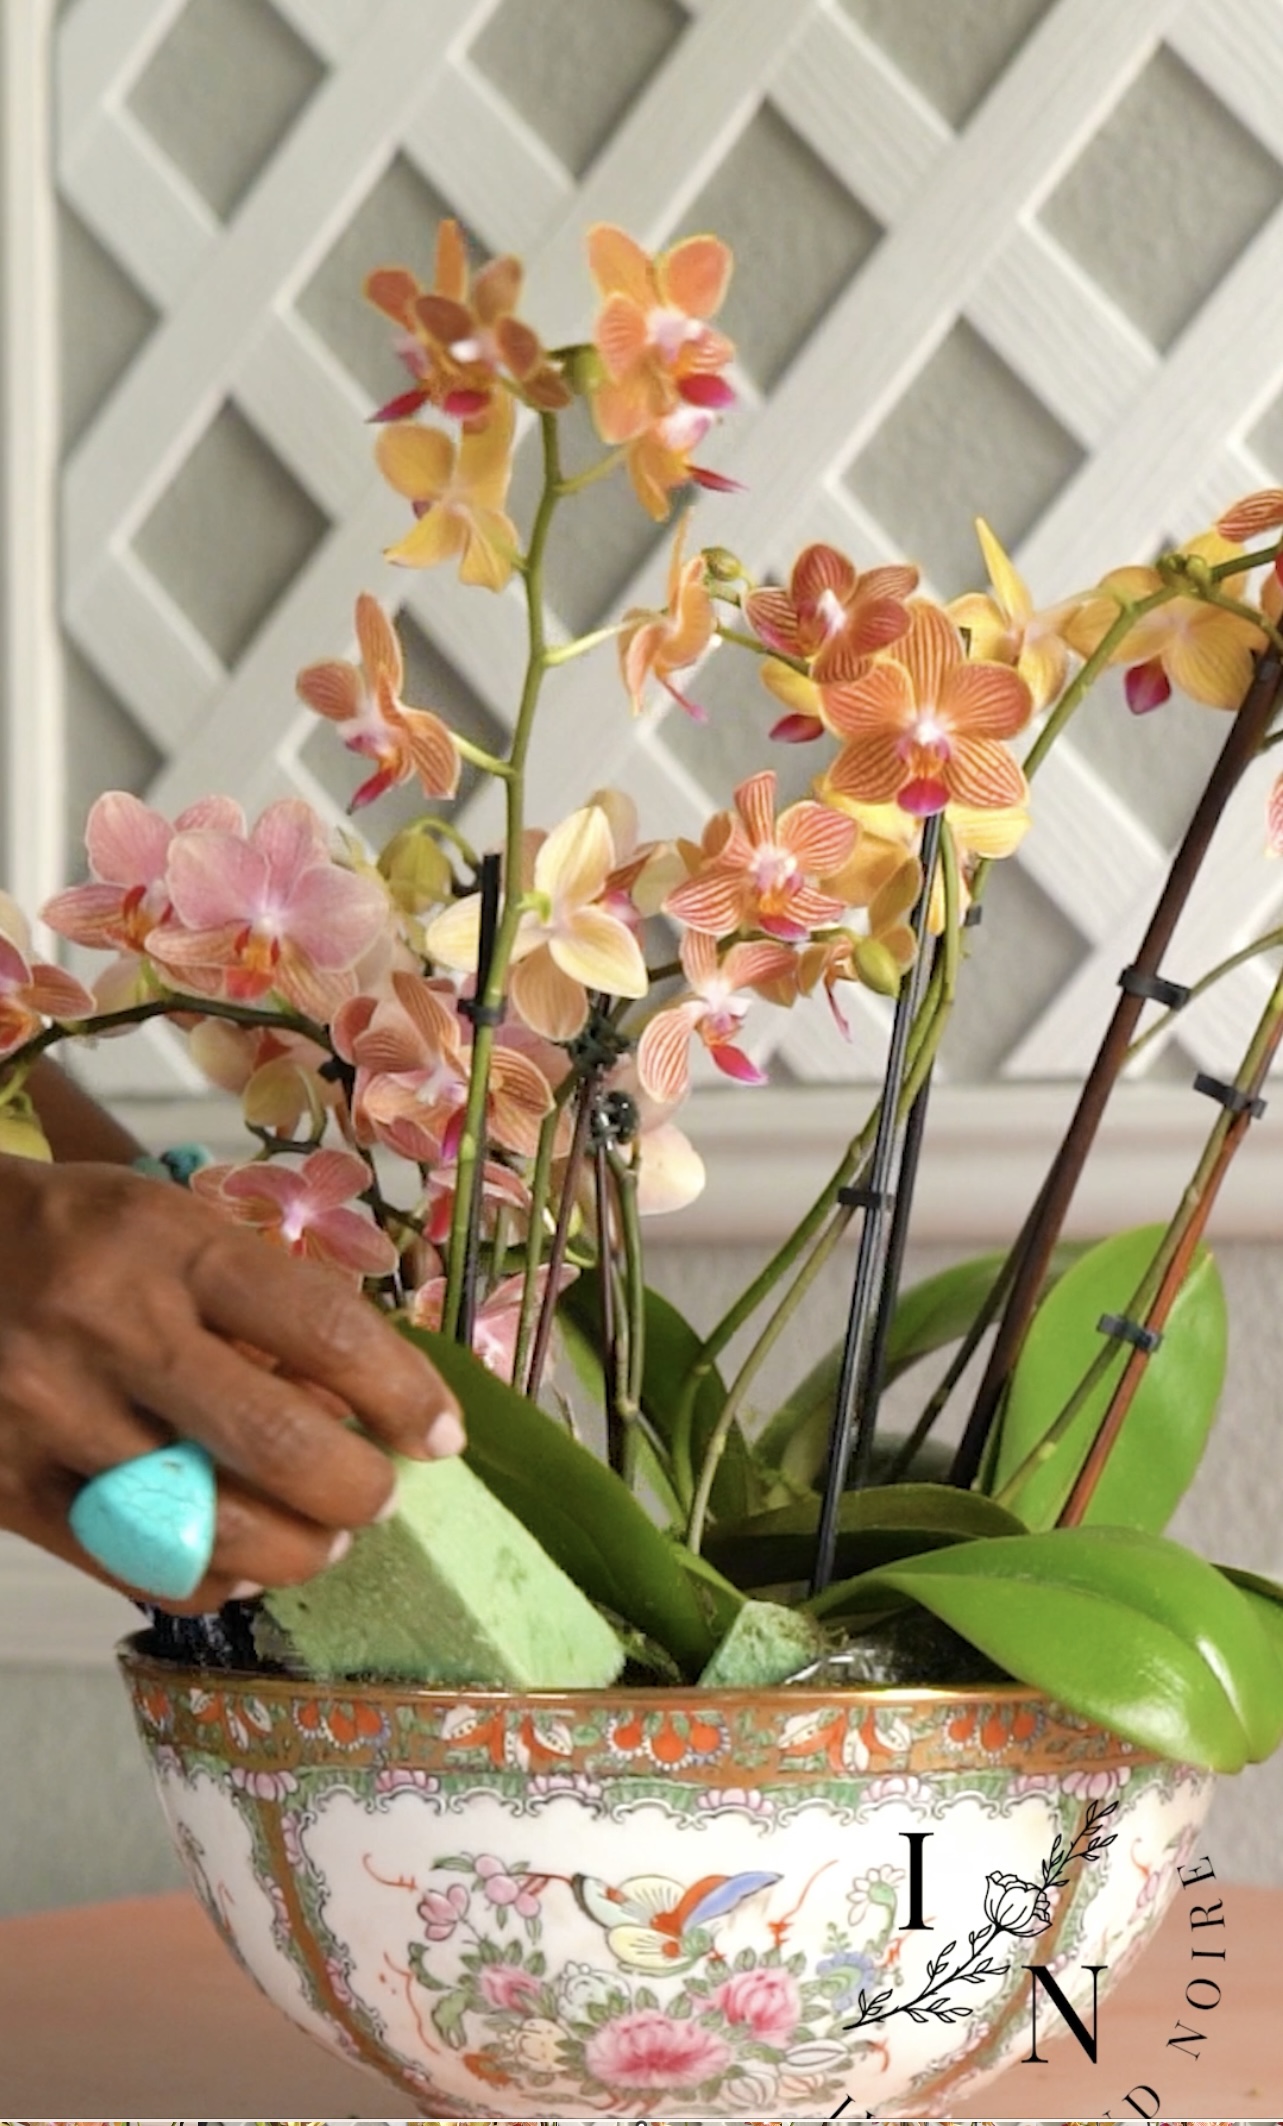
2. Position the Orchids: Arrange the mini orchid plants in the bowl, creating a visually appealing layout. Ensure that most of the leaves are facing toward the rim of the bowl for an attractive presentation.

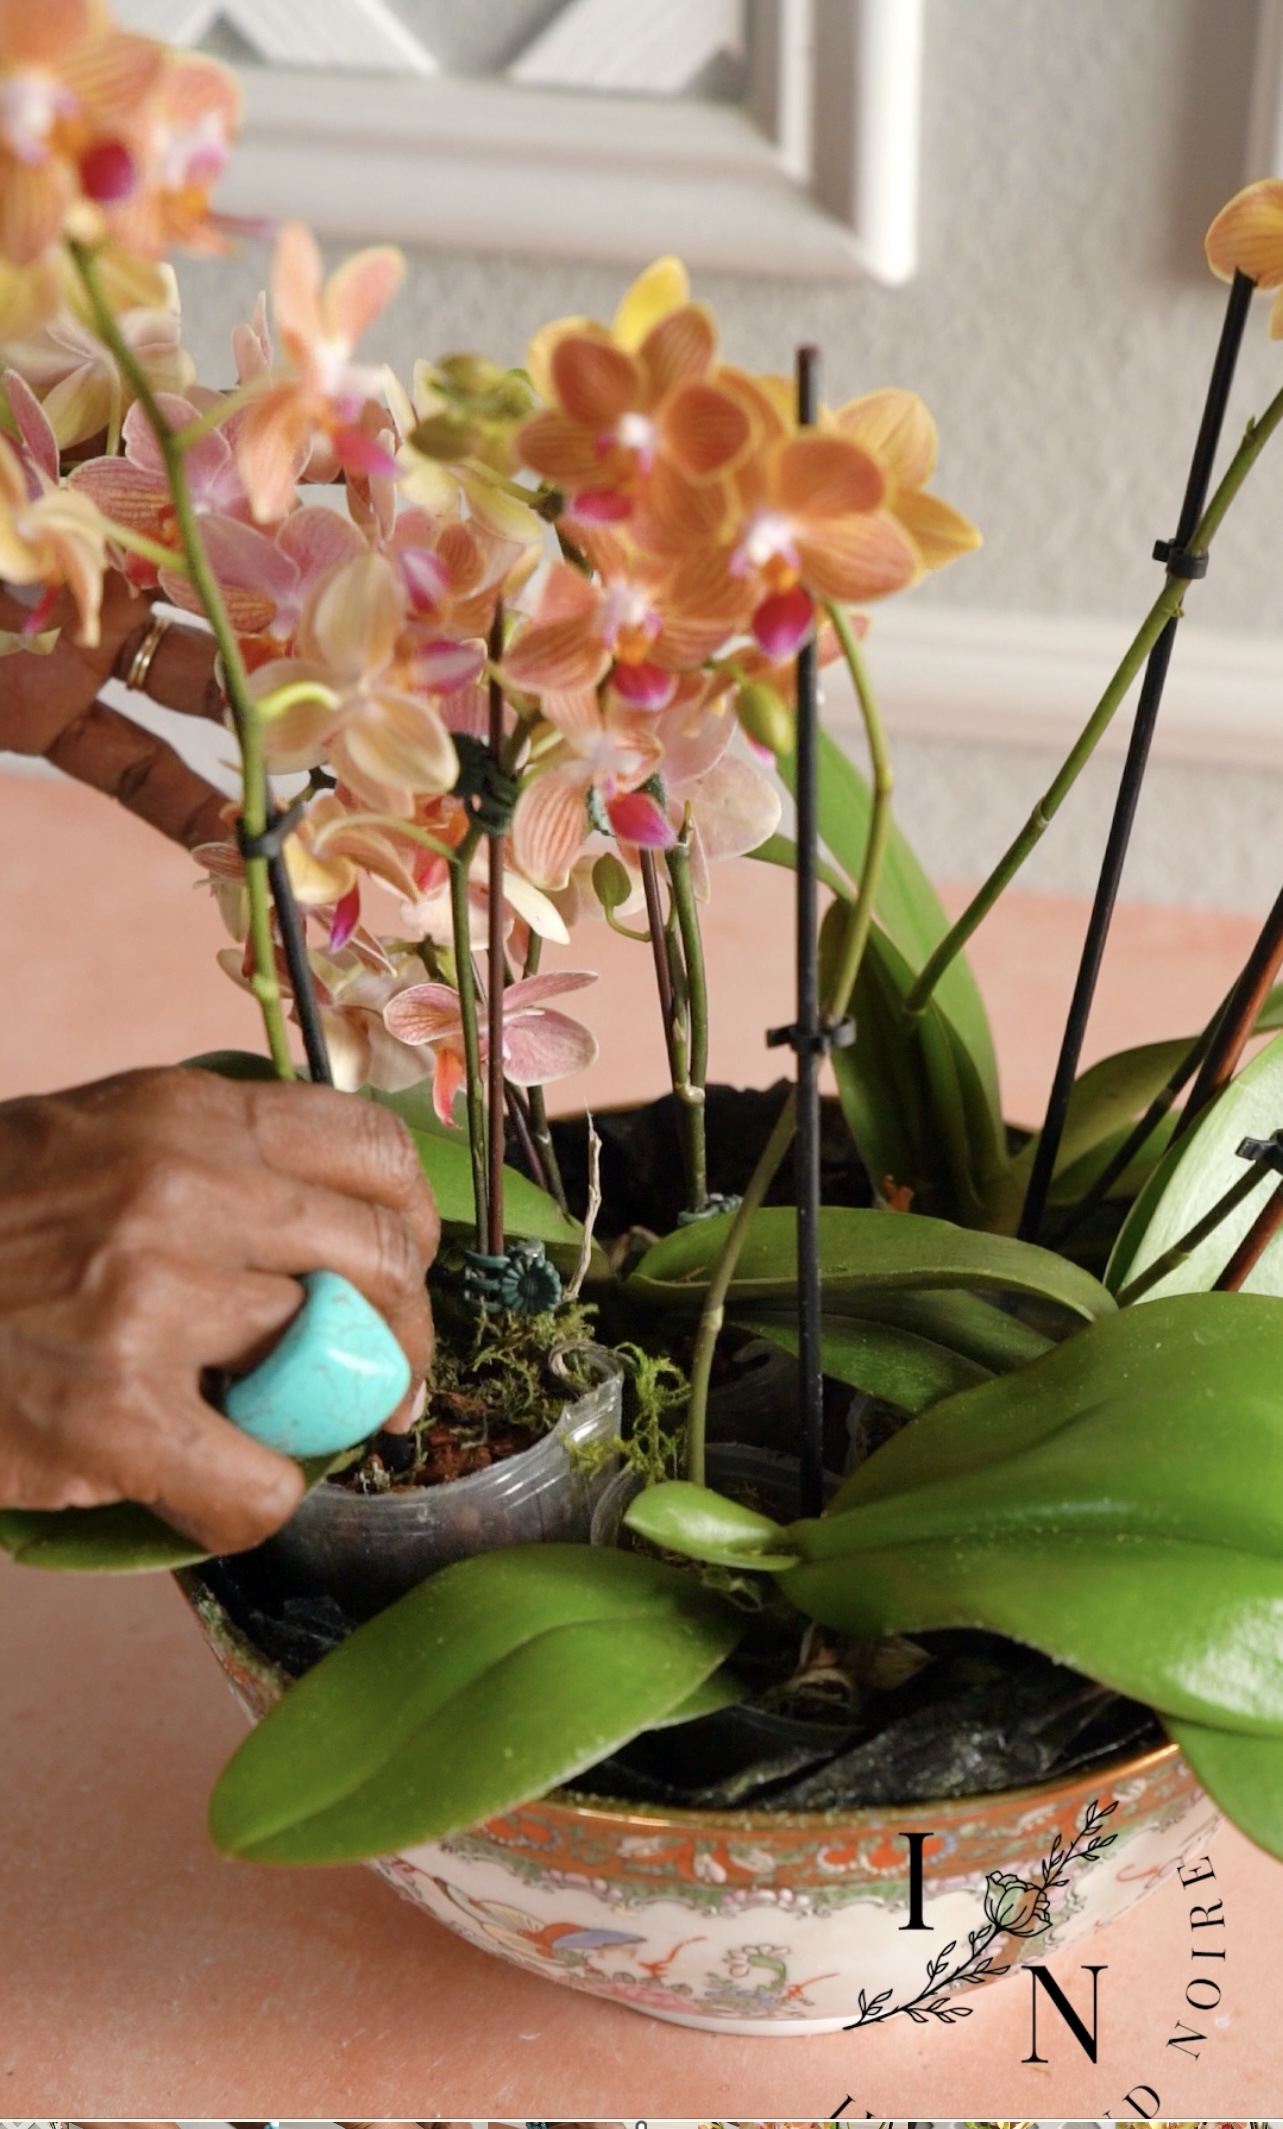
3. Stabilize with Floral Foam: Fill any gaps between the orchid plants with pieces of floral foam to stabilize the arrangement and help the orchids stand upright and in place. Make adjustments until you achieve the desired look.
Besides floral foam, brown craft paper crumbled into small balls could also be used. If you are creating more of a permanent arrangement ( your vessel has an opening for water drainage) you can even fill in the gaps and your whole bowl with small pebbles.

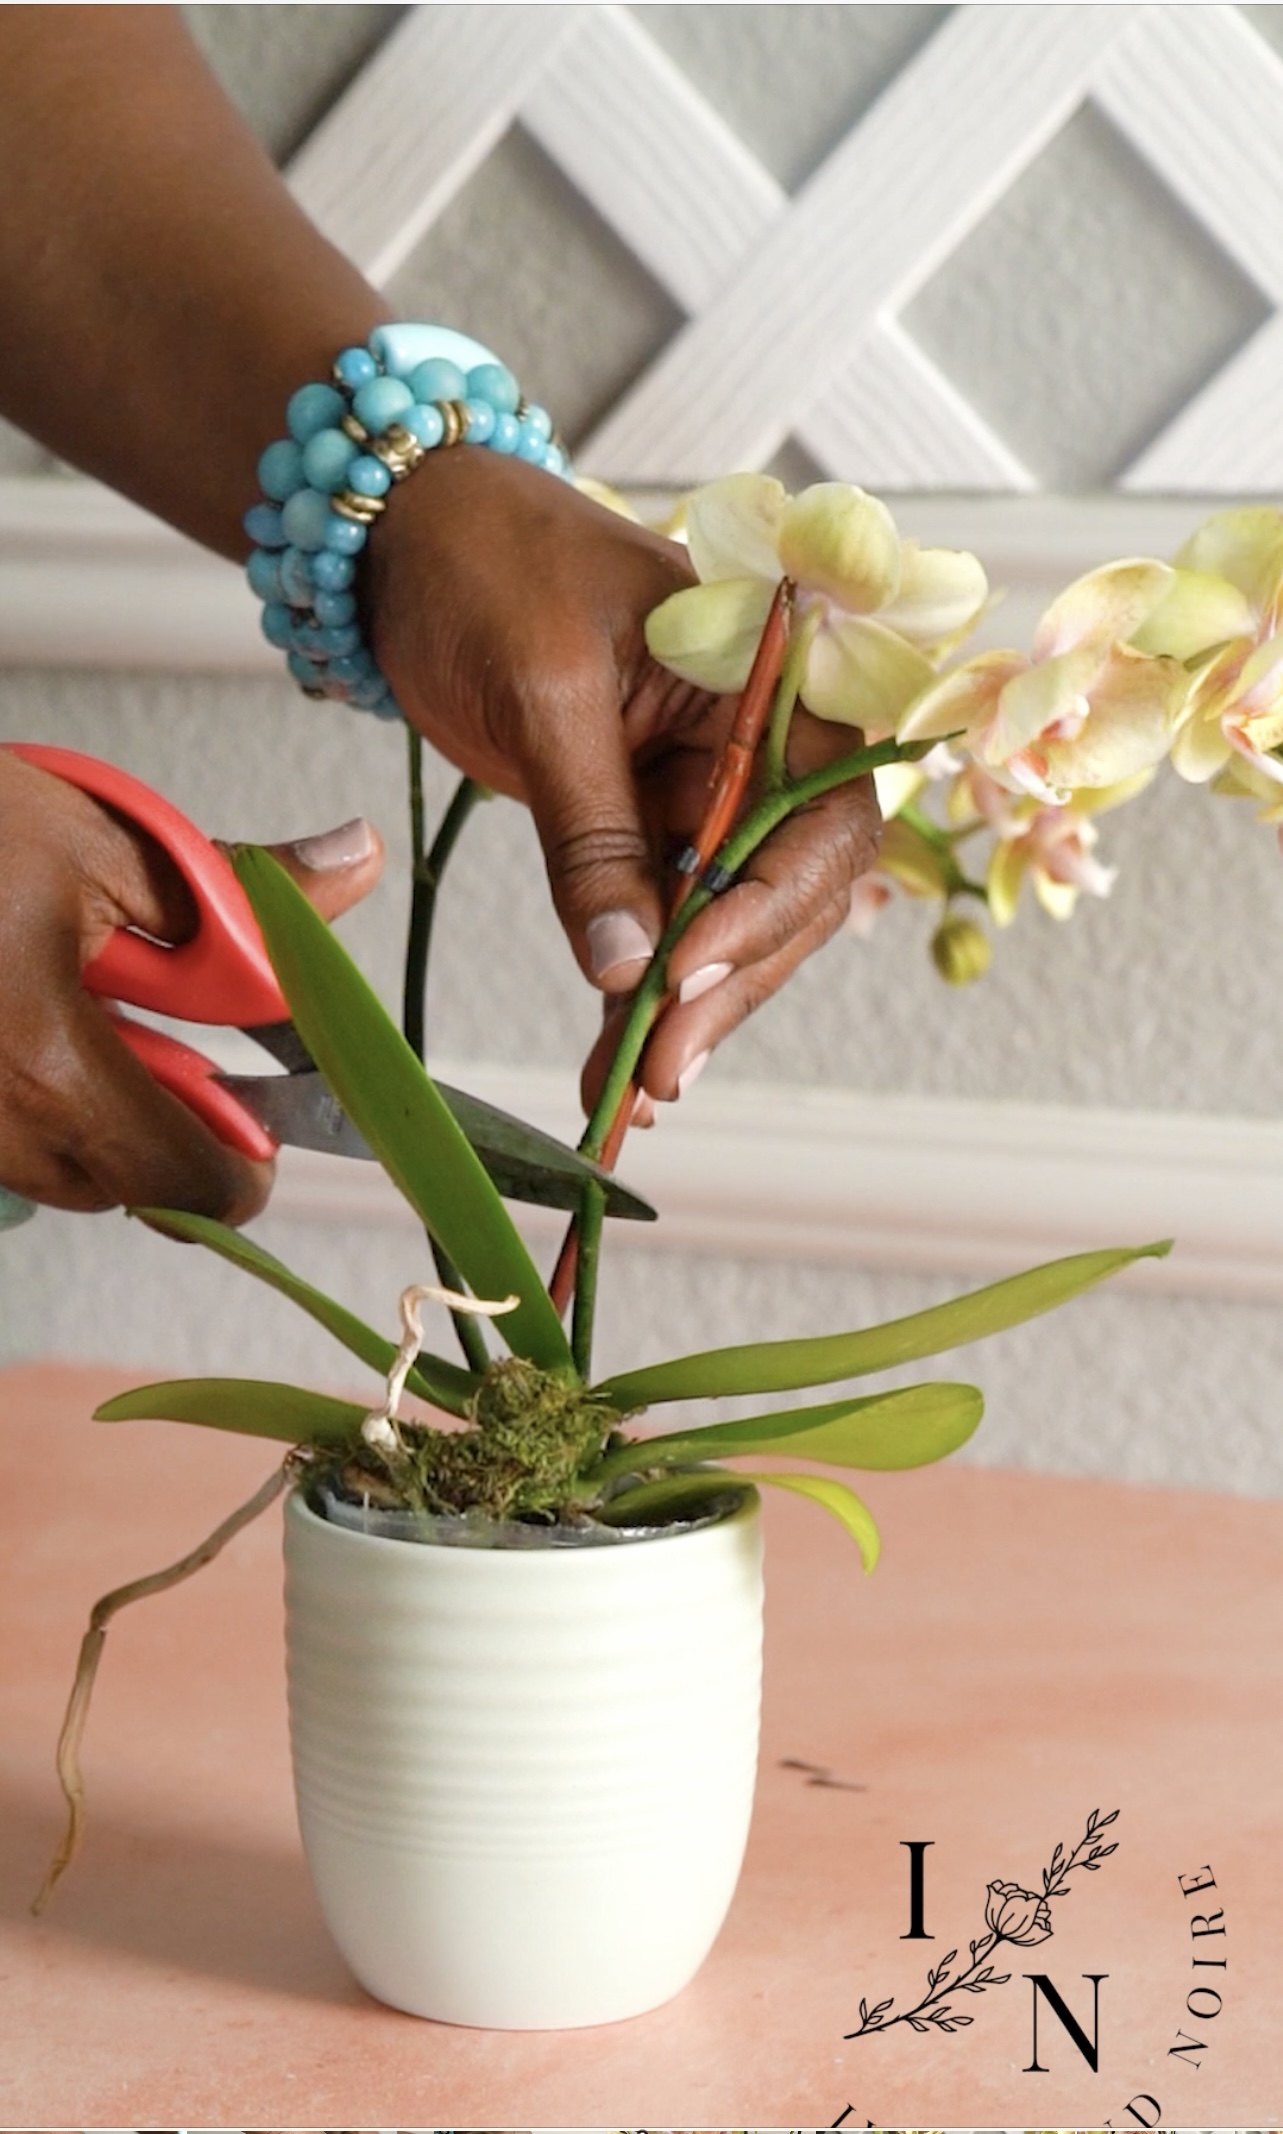
4. Add cut Orchids to add Fullness: Cut strands of orchid flowers from your additional plants. Fill a water tube with water and insert the stem of the cut orchid. Place the orchid stem in the arrangement using a water pick. Add extra foam to secure the added orchid flower stays in place. This is a way to create a grander and fuller arrangement or simply fill holes.

5. Cover with Moss: Once you’ve securely positioned all elements with foam, cover the bottom of the arrangement with pieces of moss. Ensure that the visible plastic and foam are completely concealed. Tuck the moss beneath the leaves for a seamless finish.
6. Watering Guidelines: It’s crucial to water your orchids correctly to keep them healthy. If your bowl lacks drainage, remove the orchids and moss before watering.
7. Watering Technique: To maintain your orchids’ beauty, consider adopting this watering method:
– Once a week, add 2 to 3 ice cubes at the bottom of the orchid plants. Allow them to melt slowly and nourish the plants.
– Keep the orchids away from harsh, direct sunlight to prevent damage.
8. Directions for a More Permanent Arrangement:
A Vessel with Drainage:
– If your vessel has a drainage hole, arrange the orchids in it directly, without the plastic lining. Fill the gaps and around the plants with potting dirt, small stones, or gravel. Add moss in the way we directed above if you desire.
A Vessel/ Bowl without Drainage:
For vessels that lack drainage, after laying down your plastic, place a layer of small stones about 1-1 1/2 inches thick on the bottom of your bowl before putting your orchids in. Place the orchid on top do not bury them in this layer. This allows an area for the water to drain, settle and evaporate away from the roots. Orchids need very little water and this helps them not to get overwatered and die. Remember to take into account the height of your orchids when laying down this layer to ensure this layer doesn’t add too much height, thus obstructing your guests’ view on the table. Add moss in the way directed above if you desire.
7. Watering Technique: To maintain your orchids’ beauty, consider adopting this watering method:
– Once a week, add 2 to 3 ice cubes at the bottom of the orchid plants. Allow them to melt slowly and nourish the plants.
– Keep the orchids away from harsh, direct sunlight to prevent damage.
Crafting an elegant orchid centerpiece doesn’t have to be complex. With these easy-to-follow steps, you can create a captivating floral arrangement that adds a touch of sophistication to your table. Embrace the beauty of these delicate blooms and enjoy the charm they bring to your space. Do you have any unique ways of keeping your orchids thriving? Share your insights and let’s continue nurturing these exquisite beauties together.
I put together a lovely table featuring this orchid arrangement that is a must-see. Dubbed my green and white Chinoiserie tablescape, it is one that will surely inspire!